
If you would like to make use of an external mail service such as Microsoft365 it would be required that specific MX records are created for your domain in order to connect to the mail service.
Follow the below steps to easily set the required Microsoft 365 MX records for your domain name.
- Log into your DirectAdmin control panel.

- Click on E-mail Manager then click Mx Records.
- Under Options, untick "Use this server to handle my e-mails."
- Within the MX Template dropdown menu, select "Microsoft 365"
- Click the Save button to update the dns records.
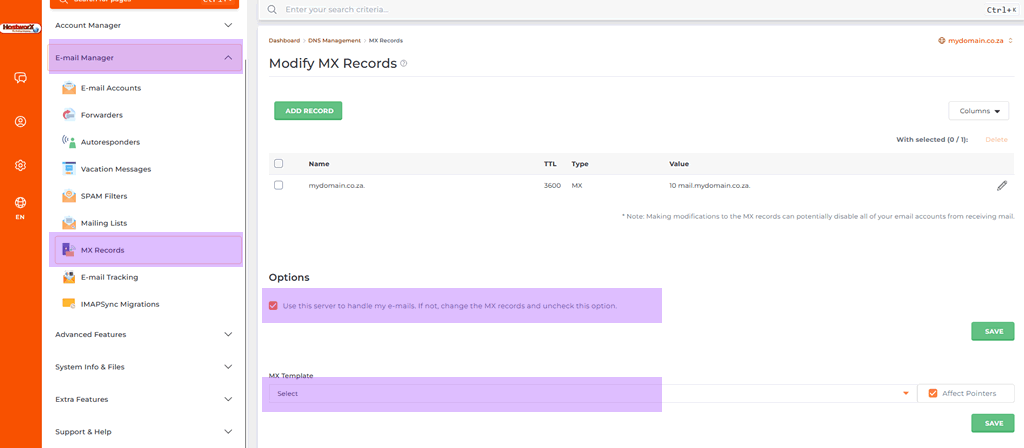
- Click the green Save button.
You have now successfully created the below MX records required to make use of Microsoft 365 external mail services.
Use these steps if you prefer a text version of the Microsoft 365 MX record setup.
Important: Changing MX records affects email delivery for your domain. Only change these records if you are ready to use Microsoft 365 for your email.
- Log into DirectAdmin.
- Click: DNS Management
- Select: Your domain name, example: yourdomain.co.za
- Locate: MX Records
- Remove any old MX records that should no longer be used.
- Add the Microsoft 365 MX record supplied by Microsoft.
- Check that the priority value matches the value provided in your Microsoft 365 admin centre.
- Add or update any additional DNS records required by Microsoft 365, such as SPF, DKIM, DMARC, CNAME, or TXT records, if Microsoft has provided them.
- Make sure the mail service is no longer pointing to the old email provider if you are moving email fully to Microsoft 365.
- Click: Save
- Allow time for DNS propagation.
DNS changes can take time to update across the internet. During this time, email delivery may be delayed or may still route to the old email provider.
If you are unsure which records to remove or add, contact HostworX Support before making changes.


